ページ「MediaWikiの「構文ハイライトエラー」」と「C♯のモジュールからC++のDLLを呼び出してみる」の間の差分
Rin-scrooge (トーク | 投稿記録) |
Rin-scrooge (トーク | 投稿記録) (→モデル) |
||
| 1行目: | 1行目: | ||
| − | + | 久しぶりにやったら、すっかり忘れていたので覚書… | |
| − | |||
| + | == C++のDLLプロジェクト作成 == | ||
| + | まず、C++のDLLを作成するときの注意点… | ||
| + | 作成するプロジェクトは、「Win32プロジェクト」を選択するんだ。<br/> | ||
| + | [[ファイル:CShapeToCppDll-005.jpg]] | ||
| − | |||
| − | |||
| + | あと…アプリケーションの設定では「DLL」と「空のプロジェクト」を選択してね。<br/> | ||
| + | [[ファイル:CShapeToCppDll-001.jpg]]<br/> | ||
| − | |||
| − | + | 空のプロジェクトが作成されたら「cpp」「h」「def」ファイルを追加するんだ。今回は「CppDll.cpp」「CppDll.h」「CppDll.def」を追加したよ。 | |
| − | |||
| − | |||
| − | |||
| − | |||
| − | + | そしたら、プロジェクトのプロパティを開いて「構成プロパティ→リンカー→入力→モジュール定義ファイル」に「CppDll.def」を設定するんだ。<br/> | |
| − | < | + | (DebugとReleaseでそれぞれ設定する必要があるんだよ。)<br/> |
| − | + | [[ファイル:CShapeToCppDll-002.jpg]]<br/> | |
| + | == DLLのコード == | ||
| + | === ヘッダーファイル(*.h) === | ||
| + | <syntaxhighlight lang="cpp"> | ||
| + | #ifndef DLLAPI | ||
| + | #define DLLAPI extern "C" __declspec(dllimport) | ||
| + | #endif | ||
| − | + | DLLAPI long __stdcall _Sum(const long p_Number1, const long p_Number2); | |
| − | + | </syntaxhighlight> | |
| + | === コードファイル(*.cpp) === | ||
| + | <syntaxhighlight lang="cpp"> | ||
| + | #define DLLAPI | ||
| − | + | #include "CppDll.h" | |
| − | |||
| + | DLLAPI long __stdcall _Sum(const long p_Number1, const long p_Number2) | ||
| + | { | ||
| + | return p_Number1 + p_Number2; | ||
| + | } | ||
| + | </syntaxhighlight> | ||
| − | + | === モジュール定義ファイル(*.def) === | |
| − | <syntaxhighlight lang=" | + | <syntaxhighlight lang="text"> |
| + | LIBRARY CppDll | ||
| + | EXPORTS | ||
| + | _Sum | ||
| + | </syntaxhighlight> | ||
| − | + | == C♯のプロジェクト作成 == | |
| − | + | ほとんどそのまま作るんだけど…ソリューションのコンパイル対策をしておくよ。 | |
| − | |||
| + | === ビルドイベントの設定 === | ||
| + | C++のDLLはソリューションフォルダ直下の「Debug」や「Release」フォルダにDLLが格納されてしまうんだ。そうすると、デバッグするときにDLLが見つからないので、ビルドイベントを使ってコピーしてしまうよ。以下のように設定してね。(「Release」コンパイルするまでは「Release」フォルダがないのでコメントアウトしているよ)<br/> | ||
| + | [[ファイル:CShapeToCppDll-004.jpg]]<br/> | ||
| − | + | === プロジェクトの依存関係の設定 === | |
| − | < | + | コピーするにもちゃんとリコンパイルされた資源をコピーしないといけないので、プロジェクトの依存関係を設定することで、ビルドの順番を設定するよ。<Br/> |
| − | + | ソリューションエクスプローラーからC♯のプロジェクトを右クリックして「ビルド依存関係」→「プロジェクト依存関係」を選択してね。<br/> | |
| + | 「依存関係」タブの依存先にC++のプロジェクトが表示されているはずだから、チェックを入れてOKボタンをクリックしてね。 | ||
| − | = | + | == C♯のコード == |
| − | + | MVVMモデルでサンプルを作ったからビューモデルが入っているけど…DLLを呼ぶには必要ないから無視してね。 | |
| + | === モデル === | ||
| + | <syntaxhighlight lang="C#"> | ||
| + | using System; | ||
| + | using System.Collections.Generic; | ||
| + | using System.Linq; | ||
| + | using System.Text; | ||
| + | using System.Threading.Tasks; | ||
| + | using System.Windows; | ||
| + | using System.Windows.Controls; | ||
| + | using System.Windows.Data; | ||
| + | using System.Windows.Documents; | ||
| + | using System.Windows.Input; | ||
| + | using System.Windows.Media; | ||
| + | using System.Windows.Media.Imaging; | ||
| + | using System.Windows.Navigation; | ||
| + | using System.Windows.Shapes; | ||
| + | //追加 | ||
| + | using System.Runtime.InteropServices; | ||
| − | + | namespace CSharpToCDLL | |
| − | + | { | |
| − | < | + | /// <summary> |
| − | + | /// MainWindow.xaml の相互作用ロジック | |
| + | /// </summary> | ||
| + | public partial class MainWindow : Window | ||
| + | { | ||
| + | /// <summary> | ||
| + | /// DLLの関数定義 | ||
| + | /// </summary> | ||
| + | /// <param name="p_Number1">数値1</param> | ||
| + | /// <param name="p_Number2">数値2</param> | ||
| + | /// <returns>合計</returns> | ||
| + | [DllImport("CppDll.dll")] | ||
| + | private extern static Int32 _Sum(Int32 p_Number1,Int32 p_Number2); | ||
| + | /// <summary> | ||
| + | /// 標準のコンストラクタ | ||
| + | /// </summary> | ||
| + | public MainWindow() | ||
| + | { | ||
| + | InitializeComponent(); | ||
| + | } | ||
| − | + | /// <summary> | |
| − | < | + | /// ボタンクリックイベントハンドラ |
| − | + | /// </summary> | |
| − | + | /// <param name="sender">イベント送信元</param> | |
| + | /// <param name="e">イベント情報</param> | ||
| + | private void Button_Click(object sender, RoutedEventArgs e) | ||
| + | { | ||
| + | //DLLの関数を呼び出す | ||
| + | Int32 l_Result = _Sum(300, 500); | ||
| + | //計算結果の表示 | ||
| + | MessageBox.Show("計算結果:" + l_Result.ToString()); | ||
| + | } | ||
| + | } | ||
| + | } | ||
| + | </syntaxhighlight> | ||
| − | + | === ビュー === | |
| − | + | <source lang="xml"> | |
| − | < | + | <Window x:Class="CSharpToCDLL.MainWindow" |
| − | + | xmlns="http://schemas.microsoft.com/winfx/2006/xaml/presentation" | |
| − | """ | + | xmlns:x="http://schemas.microsoft.com/winfx/2006/xaml" |
| − | + | Title="MainWindow" | |
| − | + | Height="77.056" | |
| + | Width="525"> | ||
| + | <Grid> | ||
| + | <Grid.RowDefinitions> | ||
| + | <RowDefinition Height="5"/> | ||
| + | <RowDefinition Height="24"/> | ||
| + | <RowDefinition/> | ||
| + | <RowDefinition Height="5"/> | ||
| + | </Grid.RowDefinitions> | ||
| + | <Grid.ColumnDefinitions> | ||
| + | <ColumnDefinition Width="5"/> | ||
| + | <ColumnDefinition/> | ||
| + | <ColumnDefinition Width="5"/> | ||
| + | <ColumnDefinition Width="75"/> | ||
| + | <ColumnDefinition Width="5"/> | ||
| + | </Grid.ColumnDefinitions> | ||
| + | <Label | ||
| + | Grid.Row="1" | ||
| + | Grid.Column="1" | ||
| + | Content="{Binding Label_Content}"/> | ||
| + | <Button | ||
| + | Grid.Row="1" | ||
| + | Grid.Column="3" | ||
| + | Content="実行" | ||
| + | Click="Button_Click"/> | ||
| + | </Grid> | ||
| + | </Window> | ||
| + | </source> | ||
| + | === ビューモデル === | ||
| + | <source lang="csharp"> | ||
| + | using System; | ||
| + | using System.Collections.Generic; | ||
| + | using System.Linq; | ||
| + | using System.Text; | ||
| + | using System.Threading.Tasks; | ||
| − | + | //追加 | |
| − | + | using System.ComponentModel; | |
| − | |||
| − | |||
| − | |||
| − | |||
| − | |||
| − | |||
| − | |||
| + | namespace CSharpToCDLL | ||
| + | { | ||
| + | class MainWindowViewModel : INotifyPropertyChanged | ||
| + | { | ||
| + | /// <summary> | ||
| + | /// ラベル表示用変数 | ||
| + | /// </summary> | ||
| + | private String m_Label_Content; | ||
| − | + | /// <summary> | |
| − | + | /// ラベル表示文字列 | |
| + | /// </summary> | ||
| + | public String Label_Content | ||
| + | { | ||
| + | set | ||
| + | { | ||
| + | this.m_Label_Content = value; | ||
| + | this.OnPropertyChanged("Label_Content"); | ||
| + | } | ||
| + | get { return this.m_Label_Content; } | ||
| + | } | ||
| − | + | /// <summary> | |
| − | + | /// プロパティ変更イベントハンドラ | |
| − | + | /// </summary> | |
| − | + | public event PropertyChangedEventHandler PropertyChanged; | |
| − | |||
| − | |||
| − | |||
| + | /// <summary> | ||
| + | /// プロパティ変更通知 | ||
| + | /// </summary> | ||
| + | /// <param name="p_PropertyName">プロパティ名</param> | ||
| + | public void OnPropertyChanged(String p_PropertyName) | ||
| + | { | ||
| + | if (this.PropertyChanged != null) | ||
| + | { | ||
| + | this.PropertyChanged(this, new PropertyChangedEventArgs(p_PropertyName)); | ||
| + | } | ||
| + | } | ||
| + | } | ||
| + | } | ||
| + | </source> | ||
| − | + | [[Category:C♯]] | |
| − | + | [[Category:C++]] | |
| − | + | [[Category:dll]] | |
| − | |||
| − | |||
| − | |||
| − | |||
| − | |||
| − | |||
| − | |||
| − | |||
| − | |||
| − | |||
| − | |||
| − | |||
| − | |||
| − | |||
| − | |||
| − | |||
| − | |||
| − | |||
| − | |||
| − | |||
| − | |||
| − | |||
| − | |||
| − | |||
| − | |||
| − | |||
| − | |||
| − | |||
| − | |||
| − | |||
| − | |||
| − | |||
| − | |||
| − | |||
| − | |||
| − | |||
| − | |||
| − | |||
| − | |||
| − | |||
| − | |||
| − | |||
| − | |||
| − | |||
| − | |||
| − | |||
| − | |||
| − | |||
| − | |||
| − | |||
| − | |||
| − | |||
| − | |||
| − | [[Category: | ||
| − | [[Category: | ||
| − | |||
| − | [[Category: | ||
2019年7月26日 (金) 16:46時点における版
久しぶりにやったら、すっかり忘れていたので覚書…
目次
C++のDLLプロジェクト作成
まず、C++のDLLを作成するときの注意点…
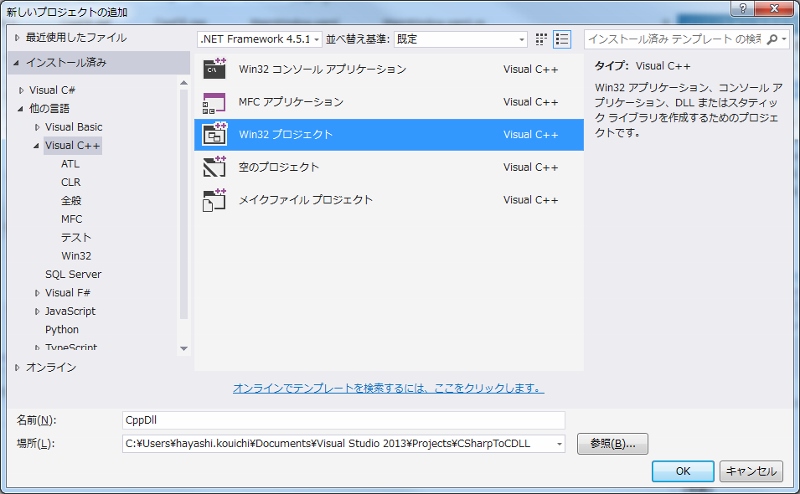
作成するプロジェクトは、「Win32プロジェクト」を選択するんだ。

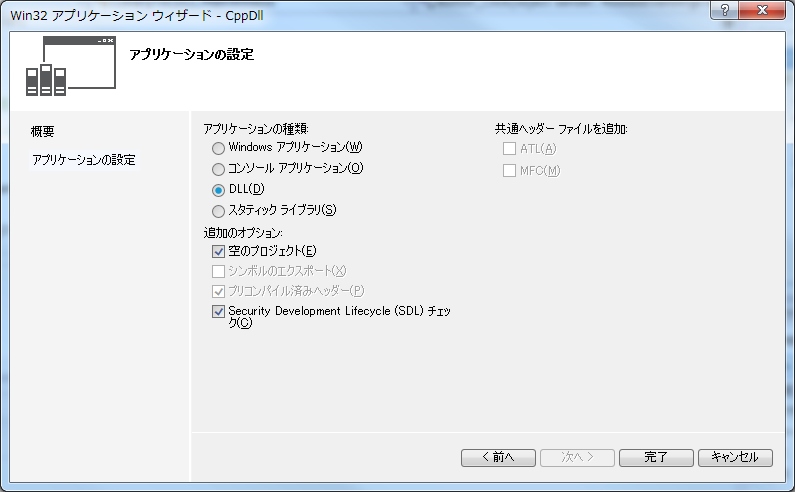
あと…アプリケーションの設定では「DLL」と「空のプロジェクト」を選択してね。

空のプロジェクトが作成されたら「cpp」「h」「def」ファイルを追加するんだ。今回は「CppDll.cpp」「CppDll.h」「CppDll.def」を追加したよ。
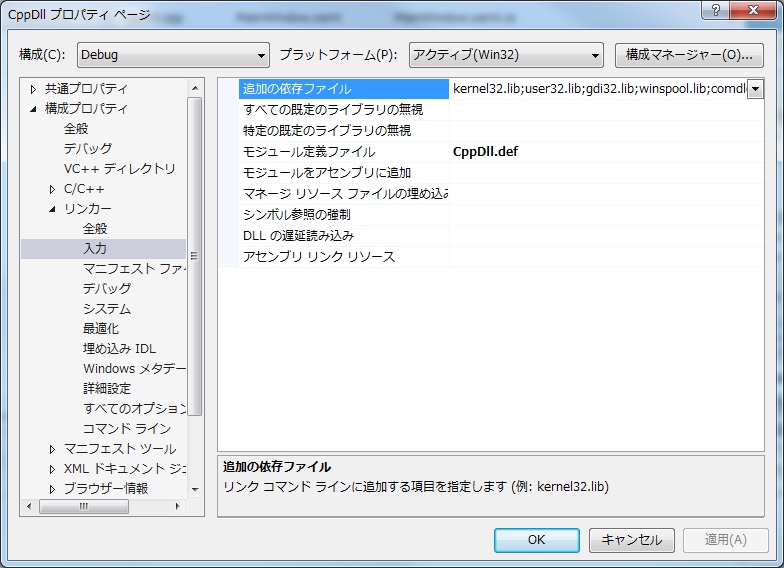
そしたら、プロジェクトのプロパティを開いて「構成プロパティ→リンカー→入力→モジュール定義ファイル」に「CppDll.def」を設定するんだ。
(DebugとReleaseでそれぞれ設定する必要があるんだよ。)

DLLのコード
ヘッダーファイル(*.h)
#ifndef DLLAPI
#define DLLAPI extern "C" __declspec(dllimport)
#endif

DLLAPI long __stdcall _Sum(const long p_Number1, const long p_Number2);
コードファイル(*.cpp)
#define DLLAPI

#include "CppDll.h"

DLLAPI long __stdcall _Sum(const long p_Number1, const long p_Number2)
{
	return p_Number1 + p_Number2;
}
モジュール定義ファイル(*.def)
LIBRARY	CppDll

EXPORTS
	_Sum
C♯のプロジェクト作成
ほとんどそのまま作るんだけど…ソリューションのコンパイル対策をしておくよ。
ビルドイベントの設定
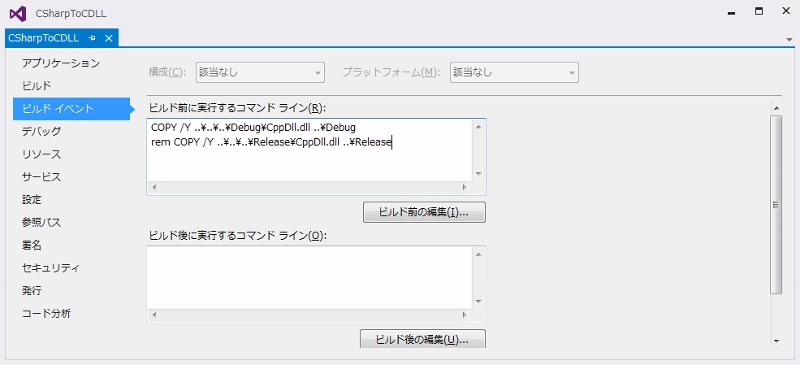
C++のDLLはソリューションフォルダ直下の「Debug」や「Release」フォルダにDLLが格納されてしまうんだ。そうすると、デバッグするときにDLLが見つからないので、ビルドイベントを使ってコピーしてしまうよ。以下のように設定してね。(「Release」コンパイルするまでは「Release」フォルダがないのでコメントアウトしているよ)

プロジェクトの依存関係の設定
コピーするにもちゃんとリコンパイルされた資源をコピーしないといけないので、プロジェクトの依存関係を設定することで、ビルドの順番を設定するよ。
ソリューションエクスプローラーからC♯のプロジェクトを右クリックして「ビルド依存関係」→「プロジェクト依存関係」を選択してね。
「依存関係」タブの依存先にC++のプロジェクトが表示されているはずだから、チェックを入れてOKボタンをクリックしてね。
C♯のコード
MVVMモデルでサンプルを作ったからビューモデルが入っているけど…DLLを呼ぶには必要ないから無視してね。
モデル
using System;
using System.Collections.Generic;
using System.Linq;
using System.Text;
using System.Threading.Tasks;
using System.Windows;
using System.Windows.Controls;
using System.Windows.Data;
using System.Windows.Documents;
using System.Windows.Input;
using System.Windows.Media;
using System.Windows.Media.Imaging;
using System.Windows.Navigation;
using System.Windows.Shapes;

//追加
using System.Runtime.InteropServices;

namespace CSharpToCDLL
{
    /// <summary>
    /// MainWindow.xaml の相互作用ロジック
    /// </summary>
    public partial class MainWindow : Window
    {
        /// <summary>
        /// DLLの関数定義
        /// </summary>
        /// <param name="p_Number1">数値1</param>
        /// <param name="p_Number2">数値2</param>
        /// <returns>合計</returns>
        [DllImport("CppDll.dll")]
        private extern static Int32 _Sum(Int32 p_Number1,Int32 p_Number2);

        /// <summary>
        /// 標準のコンストラクタ
        /// </summary>
        public MainWindow()
        {
            InitializeComponent();
        }

        /// <summary>
        /// ボタンクリックイベントハンドラ
        /// </summary>
        /// <param name="sender">イベント送信元</param>
        /// <param name="e">イベント情報</param>
        private void Button_Click(object sender, RoutedEventArgs e)
        {
            //DLLの関数を呼び出す
            Int32 l_Result = _Sum(300, 500);

            //計算結果の表示
            MessageBox.Show("計算結果:" + l_Result.ToString());
        }
    }
}
ビュー
<Window x:Class="CSharpToCDLL.MainWindow"
        xmlns="http://schemas.microsoft.com/winfx/2006/xaml/presentation"
        xmlns:x="http://schemas.microsoft.com/winfx/2006/xaml"
        Title="MainWindow"
        Height="77.056"
        Width="525">
    <Grid>
        <Grid.RowDefinitions>
            <RowDefinition Height="5"/>
            <RowDefinition Height="24"/>
            <RowDefinition/>
            <RowDefinition Height="5"/>
        </Grid.RowDefinitions>
        <Grid.ColumnDefinitions>
            <ColumnDefinition Width="5"/>
            <ColumnDefinition/>
            <ColumnDefinition Width="5"/>
            <ColumnDefinition Width="75"/>
            <ColumnDefinition Width="5"/>
        </Grid.ColumnDefinitions>
        <Label
            Grid.Row="1"
            Grid.Column="1"
            Content="{Binding Label_Content}"/>
        <Button
            Grid.Row="1"
            Grid.Column="3"
            Content="実行"
            Click="Button_Click"/>
    </Grid>
</Window>
ビューモデル
using System;
using System.Collections.Generic;
using System.Linq;
using System.Text;
using System.Threading.Tasks;

//追加
using System.ComponentModel;

namespace CSharpToCDLL
{
    class MainWindowViewModel : INotifyPropertyChanged
    {
        /// <summary>
        /// ラベル表示用変数
        /// </summary>
        private String m_Label_Content;

        /// <summary>
        /// ラベル表示文字列
        /// </summary>
        public String Label_Content
        {
            set
            {
                this.m_Label_Content = value;
                this.OnPropertyChanged("Label_Content");
            }
            get { return this.m_Label_Content; }
        }

        /// <summary>
        /// プロパティ変更イベントハンドラ
        /// </summary>
        public event PropertyChangedEventHandler PropertyChanged;

        /// <summary>
        /// プロパティ変更通知
        /// </summary>
        /// <param name="p_PropertyName">プロパティ名</param>
        public void OnPropertyChanged(String p_PropertyName)
        {
            if (this.PropertyChanged != null)
            {
                this.PropertyChanged(this, new PropertyChangedEventArgs(p_PropertyName));
            }
        }
    }
}